Thursday, July 13, 2017
HTTP 301 Moved Permanently
If you're seeing this, you aught to head on over to my new blog location: bhencke.com/blog
Monday, December 5, 2016
3D Printer Almost Fire
I got back in to 3D printing and modeling around May this year. It's great for prototyping case designs, and the more familiar with the tech I am, the more uses I find for it.
It's another kind of imagination manifest. Just like the bug that got me in to writing software, you know, the "OMG I can make this thing do whatever I can imagine?" kind of feeling. But now with physical objects too. Even mechanical parts that move. I find myself designing little hardware bits that are exactly what I want instead of trying to make do with stuff that already exists.
I started off by resurrecting an old Cupcake CNC, which never printed anything without issue. I replaced the electronics for about $30 so that I could load modern firmware, and replaced the ill-fated DC motor extruder with $40 thing from China. It worked! I could now actually print something, but the mechanics were so sloppy that the quality was pretty rough. Good enough for structural parts, but not fitted designs.
So I went researching and shopping around. I didn't plan on spending a lot, but didn't need much either. I found the Monoprice Maker Select v2. For something in the $350 range, it has impressive specs, and nice build quality.
Sort of.
Of the two that have arrived in working form, two have experienced power-heat related issues. The first manifested itself as "crashing" during printing, that turned out to be an issue with the power connector overheating. Turning it off and on again worked, until part way through the next print. I got it RMA'd and the replacement arrived only a few weeks ago and had printed several things successfully.
Here's the first connector heat failure, which I thought was just a fluke:

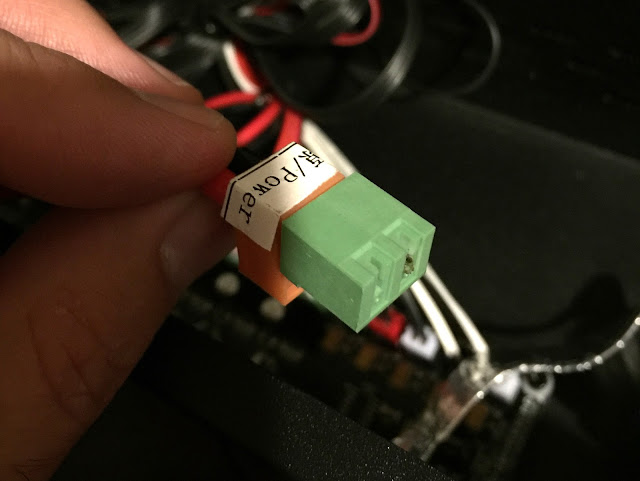
I went through Monoprice's support without much fuss. They aren't that fast, and you can expect 24-hour turnarounds with several back-and-forth questions, but ultimately they RMA'd the printer and shipped out a replacement.
I had the replacement for a few weeks, when last Friday the replacement nearly caught on fire while preheating.
This wasn't a "poof" the magic smoke escaped from some chip somewhere, this was going strong and getting worse by the time I got to it and cut power. There was a lot of smoke.
Elecia of embedded.fm helped do an autopsy and capture some charred board pictures.
 |
| Slight browning of PCB and compo |

 |
| Blackend power connector (middle right), also weird looking solder joint on hotbed connector (middle left) |

 |
| The capacitor is hiding the crater |

 |
| After removing the power connectors, you can see the crater more easily. Charred bits and exposed copper. |

So obviously the next step is to power it back on and see if it still works. We left the hotbed disconnected since it had more damage. There was a bit of a spark and a poof of smoke which seemed to "blow" the short and let the board boot up.
Yeah, I wouldn't leave it unattended.
I only have a sample size of two, but clearly there is some design or component flaw that is a real fire risk and Monoprice is still shipping (as of a few weeks ago) printers with this design.
Monoprice (and perhaps Wanhao the OEM) should recall these printers.
Despite the frequent setbacks, 3D printing has become an invaluable tool.
I'm not really sure where to go from here. I might be able to RMA this and get another printer, but there's no way I'd run this model in my house again.
The mechanical parts of the printer has worked very well for me (XYZ and extruder). Maybe I can gut the electronics, replacing it with something reprap?
Maybe they will refund it? Officially they have a 30 day refund policy which is expired even if you only count the total days both printers were running. I'd rather put the money toward a different printer, perhaps a genuine i3.
Saturday, November 22, 2014
Synthia - A 2 player light and sound instrument
Synthia
Synthia is a 2 (or more) player light and music instrument.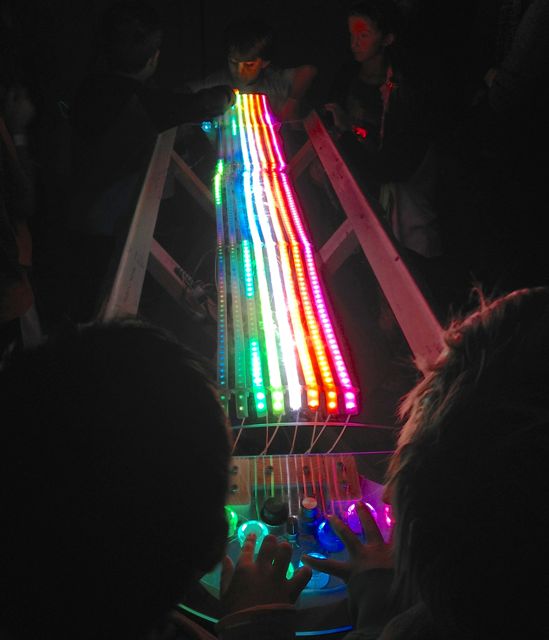
It was shown at the Santa Cruz Museum of Art and History GLOW event:
Concept
It all started when a friend asked me to collaborate on a Burning Man art project. She had an idea for a cool octagonal gazebo with a roof made out of research day-glow orange solar panels. The problem was, what on earth are we going to power with this?"I can fix that problem." I told her :) Before this, I'd considered doing some interactive light projects, but was feeling that light alone isn't very engaging. I'd wanted to do some kind of free form simon says thing or light-pad sound instrument.
The gazebo was going to be octagonal, and the number 8 struck me, and I thought of 8 directional stations, each with 8 buttons. Each station could control a different instrument, encouraging collaboration and cooperation. Each station could send pulse of light along an LED strip, perhaps simulating gravity and falling back to earth.
We didn't end up getting the grant for the project, but I had this idea stuck in my head and wanted to build at least part of it!
Structure
I scaled it down to 2 stations, facing each other across a play field. I'm no sketchup pro, but this is roughly what I was thinking: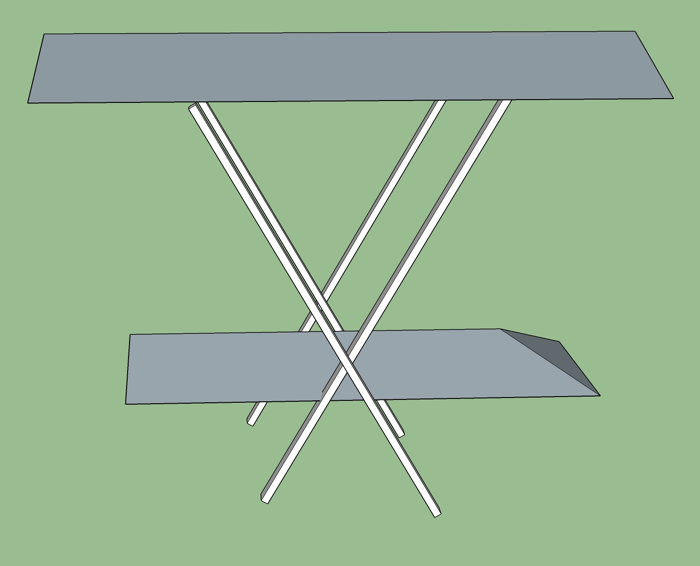
(for scale, consider the cross intersects around 3' up.)
The solar panels ended up being glass; they are heavy and kinda dangerous. A little to dangerous for being overhead and had a large enough surface area that BRC winds would have been a serious problem.
I ditched the roof, moved the solar panels to their own structure (basically a lean-to), and reinforced the play field structure to the point where drunk people couldn't cause harm and people could lean on it, park a bike, etc.
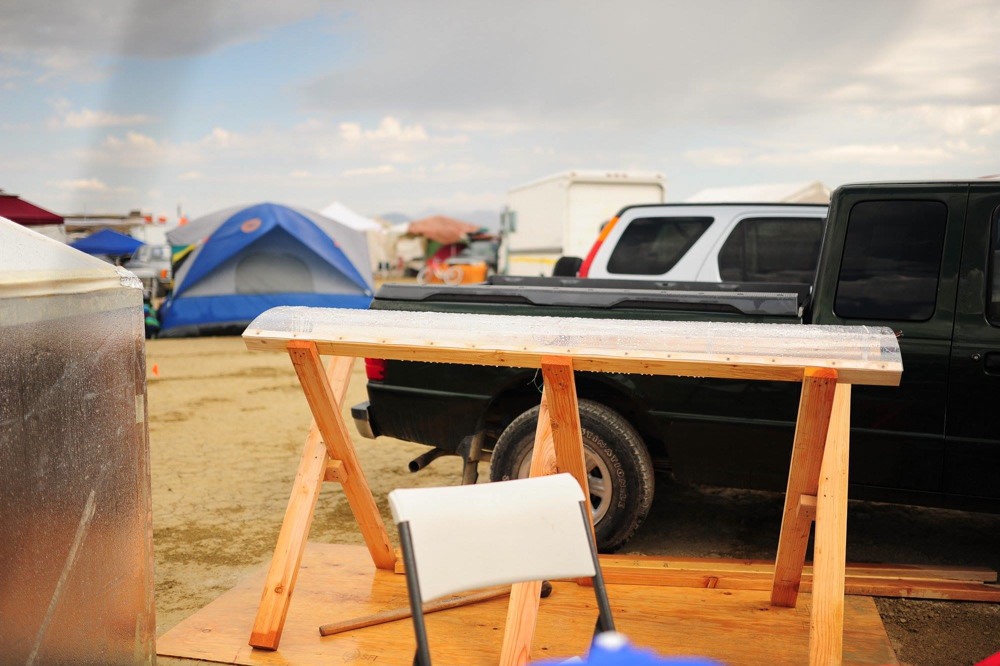
I wanted it to be more visible when viewed from the side (e.g. from far away), and thought it would be good to bow the play field, giving some extra vertical dimension from the side. I also liked the idea of clear plastic over the strips.
I ditched the roof, moved the solar panels to their own structure (basically a lean-to), and reinforced the play field structure to the point where drunk people couldn't cause harm and people could lean on it, park a bike, etc.
I wanted it to be more visible when viewed from the side (e.g. from far away), and thought it would be good to bow the play field, giving some extra vertical dimension from the side. I also liked the idea of clear plastic over the strips.
Component overview
Brains
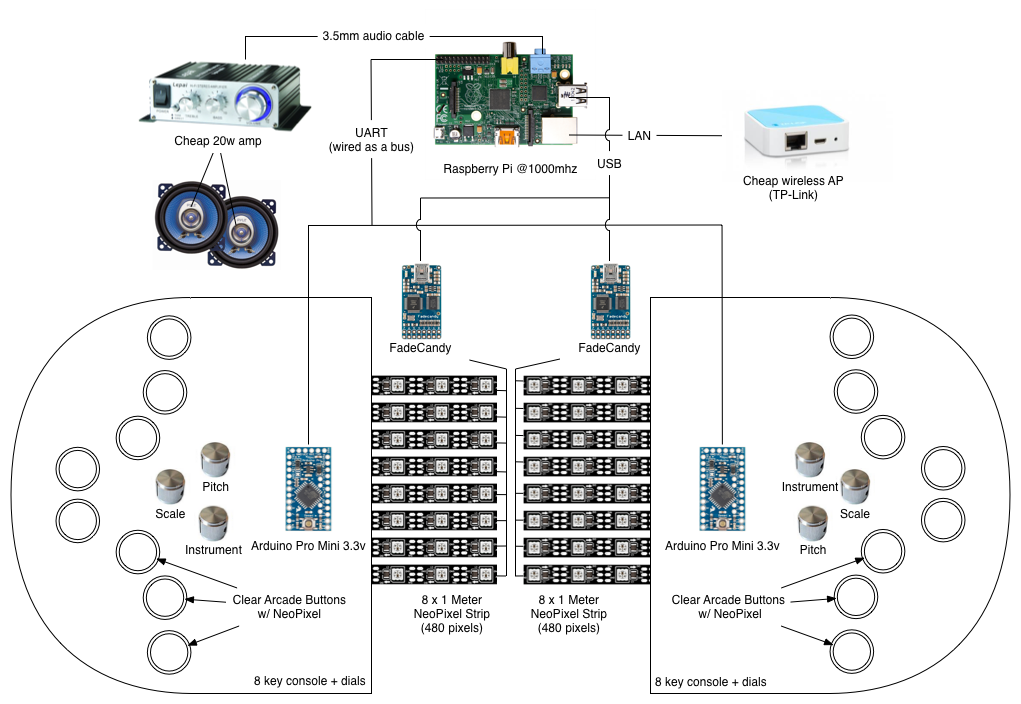
Synthia is powered by a Rasbery Pi and a pair of Arduni Pro Minis.Why Pi? There was something attractive about using a Raspberry Pi and the challenge of getting everything to work on it. Also I wouldn't mind as much if the playa killed it than a laptop.
With a little bit of microcontroller glue, the Pi's serial port could be used to drive the 960 NeoPixels. Unfortunately NeoPixels max out around 800kbps and 960 pixels, the maximum framerate would be around 35 fps and with some noticeable tearing as each pixel was drawn successively.
A low refresh rate meant I'd need to combine frames or the light would look like it skipped over some pixels when things were moving fast. Experimentation showed that these look much better at high framerates.
I ended up grabbing a pair of FadeCandy controllers. Internally they drive something like 400fps. They also present a really easy to use network protocol.
Here's an early prototype of working sound and light:
Input
There are 16 buttons and 6 pots to scan, and the Raspberry Pi model B doesn't have that kind of IO.I delegate this to a pair of 3.3v Arduni Pro Minis. They are connected to the Pi via the UART, creating a bus so that both stations could transmit over the same line. Also, daisy chaining the button pixels off of the end of the strips didn't work well - there was too much distance and they were unreliable and would flicker. So the arduino also controls the pixels in the buttons.
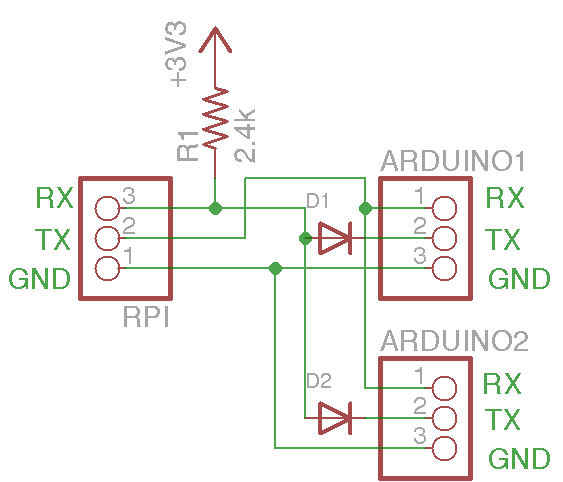 A resistor pulls the Pi's RX bus line up to 3.3v. Each station may pull the line low via the diode while transmitting.
Each station needed a good number of keys, and should light up as well. I wanted something decidedly not like a piano keyboard, and ended up with an ergonomic arcade layout. There needed to be at least 3 dials for pitch, scale, and instrument. I found some awesome 10-turn pots for the putch and instrument dials which helps when there are 70 pitch settings and over 100 instruments.
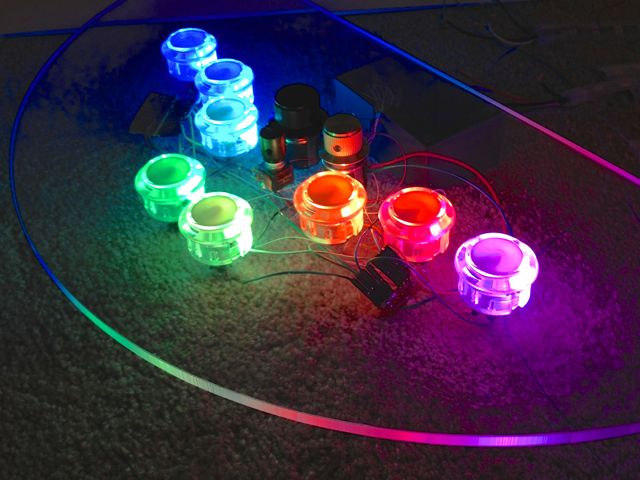
It took quite a bit to get the stations assembled. The plastic was easy enough to drill, but took some dremeling to get the buttons to fit. I also learned that soldering the buttons while they are pressed can damage them (I had the station face down, working on the underside, which pressed all the buttons).
The clear arcade buttons from adafruit worked perfectly. With a quick drill, the 5mm neopixels fit perfectly and light up the buttons beautifully.
Assembly
To get everything right, I created stencils in OmniGrafle that I could print at 1:1 and use for drill guides.Small holes in the play field plastic allow zip ties to hold the strips up.
The main structure wasn't complete before it was time to leave. At least I had got all of the googling out of the way first :)
To keep things simple and timely, it's mostly a 2x4 frame with some plywood.
Software
What language to use? Python was my first choice.Music synthesis with fluidsynth was fairly cpu intensive on the Pi with around 60-70% cpu and spikes to 100%. I couldn't play some midi files without stuttering, but I found that I could downgrade audio to 22KHz and save some cycles. Next up was sending data to fadecandy. This is where the wheels fell off; it ended up taking WAY to much cpu just to draw pixels at modest framerates. There wasn't enough CPU to play music and draw pixels.
The FadeCandy server itself wasn't taking much CPU at all, and I've really come to appreciate the optimizations they've made there.
I tried node, and it was better but still took a lot of cpu trying to drive 960 pixels at 100fps. I dusted off my old standby, Java. I got 100 fps and CPU use was less than 25%, leaving almost enough for music synthesis if Java took about the same CPU as fluidsynth.
Now to figure out a way to get a software synth running in Java and loading a soundfont (the built-in instruments are low quality). Turns out thats not so hard, but the documentation is sparse. I spent a lot of time reading old Gervill source code.
The station input needs to be polled at a fairly fast rate to avoid missing short keypresses or introducing delays.
For serial, first I tried Pi4J, but found that there's some issues. It doesn't have an interupt or blocking based serial input and polls on 100ms intervals. That kind of input latency/jitter would be really distracting.
I tried RxTx, which worked, but found CPU use was quite high.
I was digging around in Pi forums and someone mentioned ser2net - wow, ser2net is amazing. CPU was was very low, and it was very easy to set up. I would recommend this to anyone doing serial on a Pi (or any linux based system).
The Pi polls each station one at a time so that they do not talk over each other. Each station waits for it's ID, grabs the pixel data, and sends back current button state and pot measurements.
This was easier than wiring an enable pin to each station, both in terms of hardware and software. On the arduino side, it's as simple as calling Serial.find(ID). Some care was taken to make the ID unlikely to occur in the pixel data stream in case a packet becomes misaligned.
There is a simple checksum (xor) for input data, but none for the pixel data. I may add that in the future, but so far I have not observed any errors. If there are they will be corrected by the next packet.
Simulator
When developing, it was helpful to be able to hack on my laptop without having to go back and forth to try new things.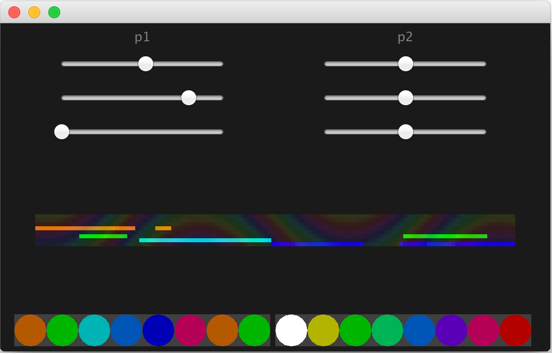
The hardware interfaces are abstracted away, and there are 3 modes that Synthia can run in:
- Emulated - A window is shown with sliders instead of knobs. I tryed to lay out the keys so 2 people could share a keyboard.
- Partial - main play area is sent to FadeCandy server, the rest is still in a window. Good for testing play field visuals.
- Hardware - runs headless, using both FadeCandy server and ser2net connection. This can also be run on a laptop if the FadeCandy server and ser2net are remotely accessible!
TODO
Right now Synthia is a fun instrument. I think there's some opportunity to add game or interaction-less modes.Sunday, October 12, 2014
Success is the cure to innovation
If necessity is the mother of invention, then success is the cure to innovation.
Yeah, thats a weird bastardization of the proverb, but let me explain.
Success means you've won. You've accomplished your goals. Your invention satisfied all of the necessities. Done. Complete. Fin.
In technology, this is never true. It's a lie. Something new will come along and knock you off the laurels you've been resting on. There are tons of examples of this everywhere.
I'm broadening terms a bit here, invention isn't exactly the same as innovation. Invention is a one time spark created by necessity. Innovation is doing something different, not just doing the same thing better. It's divergent. Different. If done right, as part of a culture or an attitude, it's infectious, and success is the cure.
An attitude built around innovation doesn't succeed. It doesn't "win." It doesn't cross the finish line, look around, shrug, and go back to watching TV. It doesn't stop.
I think that all really great people have a sort of innovation disease. It's not genius alone. What I believe sets many of them apart is that they were never satisfied. They didn't stop when by all reasonable accounts they achieved a goal. Some continued well in to old age, and even drove themselves insane trying to improve on their own masterworks. Something has disabled these people from being able to realize their successes, and stop.
Take a look around you. Literally everything you see could be improved upon. And why shouldn't it?
Do you write software? Make it work, make it right, make it fast, ship it, then analyze, and rethink everything. Expect that it is fatally flawed in some way, and do everything you can to find out how it isn't working for your users. Pretend someone else has done it better, how could they have improved on this? Challenge assumptions and constraints. Then, truly great works will follow.
There's a parallel in biology: The Red Queen hypothesis
I'm broadening terms a bit here, invention isn't exactly the same as innovation. Invention is a one time spark created by necessity. Innovation is doing something different, not just doing the same thing better. It's divergent. Different. If done right, as part of a culture or an attitude, it's infectious, and success is the cure.
An attitude built around innovation doesn't succeed. It doesn't "win." It doesn't cross the finish line, look around, shrug, and go back to watching TV. It doesn't stop.
Take a look around you. Literally everything you see could be improved upon. And why shouldn't it?
Do you write software? Make it work, make it right, make it fast, ship it, then analyze, and rethink everything. Expect that it is fatally flawed in some way, and do everything you can to find out how it isn't working for your users. Pretend someone else has done it better, how could they have improved on this? Challenge assumptions and constraints. Then, truly great works will follow.
There's a parallel in biology: The Red Queen hypothesis
Saturday, June 28, 2014
Hacking microcontroller assembler macros to provide C like conditional blocks
I started off with microcontrollers about 10 years ago using Microchip PICs. While they haven't kept pace with some of the other stuff out there and the limited development tools has relegated them to obscurity compared to the Atmel powered Arduino, I still have a place in my heart for these old favorites.
PICs are dirt cheap, and have very good internal oscillators, which means a lot less fussing around to get something working. You can get away with just the chip and a capacitor, and you can pick up chips for under a buck. They also have oodles of variations and a wide selection of peripherals that compensate for the less powerful core.
The new MPLAB X and free-tier XC8 compiler provides a usable but suboptimal development environment. The free tier compiler includes anti-optimizations that needlessly bloat your code. Some times you need to really eek out a high performance loop or control the timing of something very precisely, and the inline assembly options here just suck. For example, consider this limitation as seen in the XC8 Compiler User Guide:
Prior to MPLAB X, I used SourceBoost, which was a very basic IDE with limited features glued on to an amazing compiler. Unfortunately active development on this seems to have stopped, and only works on Windows.
SourceBoost supported C++ style templates for their C compiler, another feature I found missing when I switched to XC8. It was slightly better than the MPLAB assembler macros as it would create a reusable function tailored depending on the template args vs assembler macros that just insert the generated code inline, saving flash. In addition, it was possible to insert some assembly mostly pain-free if you needed to.
Prior to SourceBoost, I coded in assembly in the old MPLAB IDE. I had quite a bit of fun eeking out every byte of ram and flash on a PIC12F629. To make thinks easier, I took good advantage of the call stack to create functions, and the assembler macro capability to create inline functions. The dynamic code generating capabilities of the macro language they provide is more elegant and powerful than a mess of #IF directives in C.
My latest project finds me back to where I started - pure assembly. 90% of my project involves hand stitched code that is doing 4 things at once, while doing a very timing specific bit-banging with precision +- 150ns at a ~1.25us interval. At 12 million instructions per second giving 83.33ns between instructions, that doesn't really leave a lot of wiggle room, nothing close to what would be needed to implement this using a timer and interrupt service routine. With all of the headaches of gluing assembly into C code, it made sense to keep the whole thing in assembly.
The one thing I notice coding in assembly more than anything else is the lack of if-else style blocks. I don't mind adding a label, increment/decrement, and test/goto for a loop, but creating dozens of silly labels for conditionals somehow short circuits the part of my brain responsible for variable naming.
Taking an idea from Karl Lunt's PIC macro library, which implemented a for-next, repeat-until, and switch-case, I created a set of nestable if-else-endif macros. Combined with the fact that the assembler is indentation agnostic after the first column (labels), this makes it really pretty easy to create a regular C like conditional block.
This allows you to take a goto-poorly-named-label style of coding like this:
btfss flags, hasData ;bit test, skip next if set
goto noData
call readFromBuffer
movfw tmp
call putch
goto endDataCheck
noData:
;all done!
blink LED1, 1, 1000
endDataCheck:
Into this:
ifbtf flags, hasData ;if bit test
call readFromBuffer
movfw tmp
call putch
ifelse
;all done!
blink LED1, 1, 1000
ifend
You can download my library here: bensmacros.asm.
PICs are dirt cheap, and have very good internal oscillators, which means a lot less fussing around to get something working. You can get away with just the chip and a capacitor, and you can pick up chips for under a buck. They also have oodles of variations and a wide selection of peripherals that compensate for the less powerful core.
The new MPLAB X and free-tier XC8 compiler provides a usable but suboptimal development environment. The free tier compiler includes anti-optimizations that needlessly bloat your code. Some times you need to really eek out a high performance loop or control the timing of something very precisely, and the inline assembly options here just suck. For example, consider this limitation as seen in the XC8 Compiler User Guide:
The #asm and #endasm directives are used to start and end a block of assembly instructions which are to be embedded into the assembly output of the code generator. The #asm block is not syntactically part of the C program, and thus it does not obey normal C flow-of-control rules. This means that you should not use this form of in-line assembly inside or near C constructs like if(), while() , and for() statements.
Prior to MPLAB X, I used SourceBoost, which was a very basic IDE with limited features glued on to an amazing compiler. Unfortunately active development on this seems to have stopped, and only works on Windows.
SourceBoost supported C++ style templates for their C compiler, another feature I found missing when I switched to XC8. It was slightly better than the MPLAB assembler macros as it would create a reusable function tailored depending on the template args vs assembler macros that just insert the generated code inline, saving flash. In addition, it was possible to insert some assembly mostly pain-free if you needed to.
Prior to SourceBoost, I coded in assembly in the old MPLAB IDE. I had quite a bit of fun eeking out every byte of ram and flash on a PIC12F629. To make thinks easier, I took good advantage of the call stack to create functions, and the assembler macro capability to create inline functions. The dynamic code generating capabilities of the macro language they provide is more elegant and powerful than a mess of #IF directives in C.
My latest project finds me back to where I started - pure assembly. 90% of my project involves hand stitched code that is doing 4 things at once, while doing a very timing specific bit-banging with precision +- 150ns at a ~1.25us interval. At 12 million instructions per second giving 83.33ns between instructions, that doesn't really leave a lot of wiggle room, nothing close to what would be needed to implement this using a timer and interrupt service routine. With all of the headaches of gluing assembly into C code, it made sense to keep the whole thing in assembly.
The one thing I notice coding in assembly more than anything else is the lack of if-else style blocks. I don't mind adding a label, increment/decrement, and test/goto for a loop, but creating dozens of silly labels for conditionals somehow short circuits the part of my brain responsible for variable naming.
Taking an idea from Karl Lunt's PIC macro library, which implemented a for-next, repeat-until, and switch-case, I created a set of nestable if-else-endif macros. Combined with the fact that the assembler is indentation agnostic after the first column (labels), this makes it really pretty easy to create a regular C like conditional block.
This allows you to take a goto-poorly-named-label style of coding like this:
btfss flags, hasData ;bit test, skip next if set
goto noData
call readFromBuffer
movfw tmp
call putch
goto endDataCheck
noData:
;all done!
blink LED1, 1, 1000
endDataCheck:
Into this:
ifbtf flags, hasData ;if bit test
call readFromBuffer
movfw tmp
call putch
ifelse
;all done!
blink LED1, 1, 1000
ifend
You can download my library here: bensmacros.asm.
Sunday, June 22, 2014
Bad Ideas: Street Speeders
Street Speeders
So I live next to a fairly busy street. Often people will be hitting full throttle right as they pass, as there is a light just a block up, the street is fairly wide, and market 30 MPH which means closer to 45.
It's kind of annoying, just enough to remind me a few times a day as someone tears ass through my neighborhood. Double pane windows helped a lot, but doesn't counteract the 80 cubic inches of displacement in the Harley-Davidson as it accelerates 300lbs of grisly biker dude, leather, and metal studs.
For a while I've been pondering different possibilities to combat this. It had to be legal and safe, after all this is where I live. This simple set of criteria has filtered out most of my ideas.
What about a large screen shaming the drivers as they go past? Surely having a photo of you speed by talking/texting on a cell phone combined information from public records displayed on a billboard would get your attention.
Maybe too much attention. The last thing my neighborhood needs is a more distracted driver, or a riot of privacy advocates.
Bad Idea #3: "Big Brother is watching"
Down the street a bit is one of those radar displays that tells you how fast you are going, and blinks if it thinks you are going too fast. These appear to be fairly ineffective - everyone knows these don't issue tickets.What about a large screen shaming the drivers as they go past? Surely having a photo of you speed by talking/texting on a cell phone combined information from public records displayed on a billboard would get your attention.
Maybe too much attention. The last thing my neighborhood needs is a more distracted driver, or a riot of privacy advocates.
Bad Idea #2: "You are driving in a residential area"
Taking the helpful signs to the next level.
If a helpful reminder that they are driving through a residential area is a good thing, then how bad could it be to remind drivers that at any moment a cat, dog, or kid could dart into the road? What better reminder than a simulated reproduction of the experience? Imagine a stuffed animal racing toward the street to intersect with speeders, stopping safely just past curbside parking.
I can only imagine how many collisions this would cause as speeders swerve and overcorrect to avoid the faux-inevitable collision.
Bad Idea #1: "Welcome to the car wash"
Even if it would be really cool to have a speed activated sprinkler that would give speeders a wake up call, I can't imaging this working out well in the long term.
Firstly, it's not really safe. A splash of water is probably a little too startling, and could temporarily impair visibility.
Second, I have to consider that it might also hit the grisly biker dude.
Second, I have to consider that it might also hit the grisly biker dude.
Subscribe to:
Posts (Atom)